 I’ve challenged myself to post 29 honey recipes in the next month – BEFORE Rosh Hashana.
Not just your Bubbe’s honey cake. As a beekeeper and avid cook, I can take you and your honey places you’ve never been before – culinarily speaking.
So grab your honey and let’s get buzzing.
My grandson started first grade today. Wearing a mask. Not the dress-up kind. He’s already into bees. Spiderman too. 
What better way to sweeten the day than with…
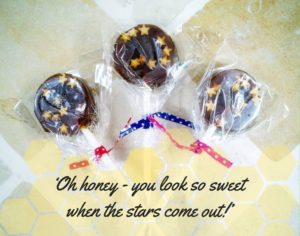
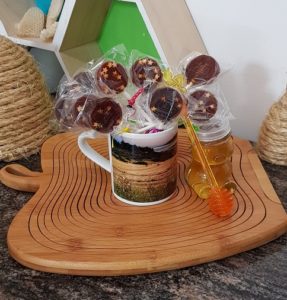
Honey Lollipops
When I first started making these a few years ago I was adamant about not using sugar. I still am but have to admit there may be some advantages. The earlier versions of the honey-only type were a danger to anyone with teeth. A wise man whose uncle had been a candy maker said, “put some beeswax in it.” Not being one to eschew the advice of an octogenarian, a gram of beeswax has become a standard ingredient for these. 
Not the best for summer as the heat and humidity tend to make them weepy, they are still quite tasty and fun. Once set, they are best stored in the refrigerator between parchment sheets. A desiccant packet helps too.
AND – if you live near bees, only make these at night. Otherwise, you’re ringing the dinner bell for about 800,000 flying creatures.
What follows are both the sugared and the honey-only versions.
You will need 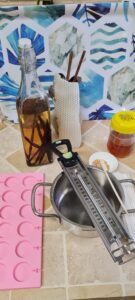
- Small pot
- Candy thermometer
- Silicon lollipop molds
- Lollipop sticks
- Baking parchment – optional
- Stovetop burner
For the Honey-Only Version:
- 2 tablespoons of lemon juice
- 5 drops of flavoring – I use vanilla
- 2g beeswax
- 200g honey – lighter honey is better as it’s less likely to burn
- A scant amount of cocoa margarine to grease the molds
- Sprinkles if desired
- Lustre dust if desired
For the Included Sugar Version:
- 250g white sugar
- 80g honey – lighter honey is better as it’s less likely to burn
- 2 tablespoons of lemon juice
- 5 drops of flavoring – I use vanilla
- 2g beeswax
- A scant amount of cocoa margarine to grease the molds
- Sprinkles if desired
- Lustre dust if desired
What to do now… (the process is identical whether you’re using sugar & honey, or only honey)
Phase 1 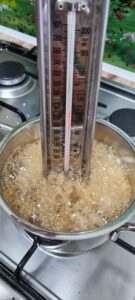
- Pour the honey (or honey/sugar combo) into the pot and cook on low without stirring
- Using the candy thermometer, monitor the temperature closely – your goal is 148c a.k.a. hard crack
Phase 1.5
While you are monitoring the boiling honey:
- Place your mold(s) on the baking paper – choose a flat surface
- Grease your molds with the cocoa margarine
- Place sprinkles and luster dust (if you desire) into the molds
- Place the sticks into the molds
Phase 2 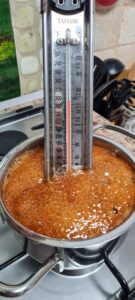
- Once the temperature is reached, remove from heat and allow to rest for 1 minute
-
-
- Be very careful. The only thing hotter than boiling candy is boiling candy stuck to your skin
-
-
- After 1 minute add the lemon juice, vanilla, and beeswax
- Stir thoroughly trying not to get much up the sides of the pan – my preferred tool for this is a bamboo fruit skewer because I can dispose of it when finished
- Allow to rest for 3 minutes
- Pour into molds
- Twist the stick gently to ensure coverage and embedding

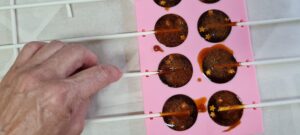
If you have excess, just drop some around the edges onto the baking paper
Allow to cool for several hours. If your kitchen is humid, move them to the refrigerator. Remember how honey sucks the moisture out of everything? That’s something we’re trying to avoid here.
So 4-6 hours later… ta-dah! Yum. And always remember: it took about 36 1/2 bees to make the honey for each one, and to brush your teeth.